
How to start a stream on Twitch: detailed guide for beginners to go live
You watch streams, observe communication in chat and think: "I can do this too". The thought to start streaming on Twitch visits thousands of people, but many are stopped by the illusion of complexity. In reality, to launch a Twitch stream from a desktop computer, you don't need expensive equipment and a million subscribers from the first day. You need a clear plan and everything you need to know about basic principles.
This guide is exactly such a plan. We will go the path from idea to the first donation, avoiding common mistakes and answering the main question: how to stream on Twitch so it will be a pleasure for you and interesting for viewers. If you are ready to start your streaming journey, forget template advice like "just be yourself" — here are only practical and checked steps.
Why is it worth understanding how to make a stream on Twitch? It is not just a hobby, but a whole digital world. Streamers on Twitch create communities, share skills in gaming, creativity, or just communicate. Success comes not to those who have better graphics, but to those who can hold attention and create a comfortable atmosphere.
First steps: preparation for stream launch
Determination to start streaming is great. Now let's turn it into concrete actions. Preparation is divided into three blocks: technical equipment, streaming software setup, and channel visuals. This is the foundation on which everything else is built.
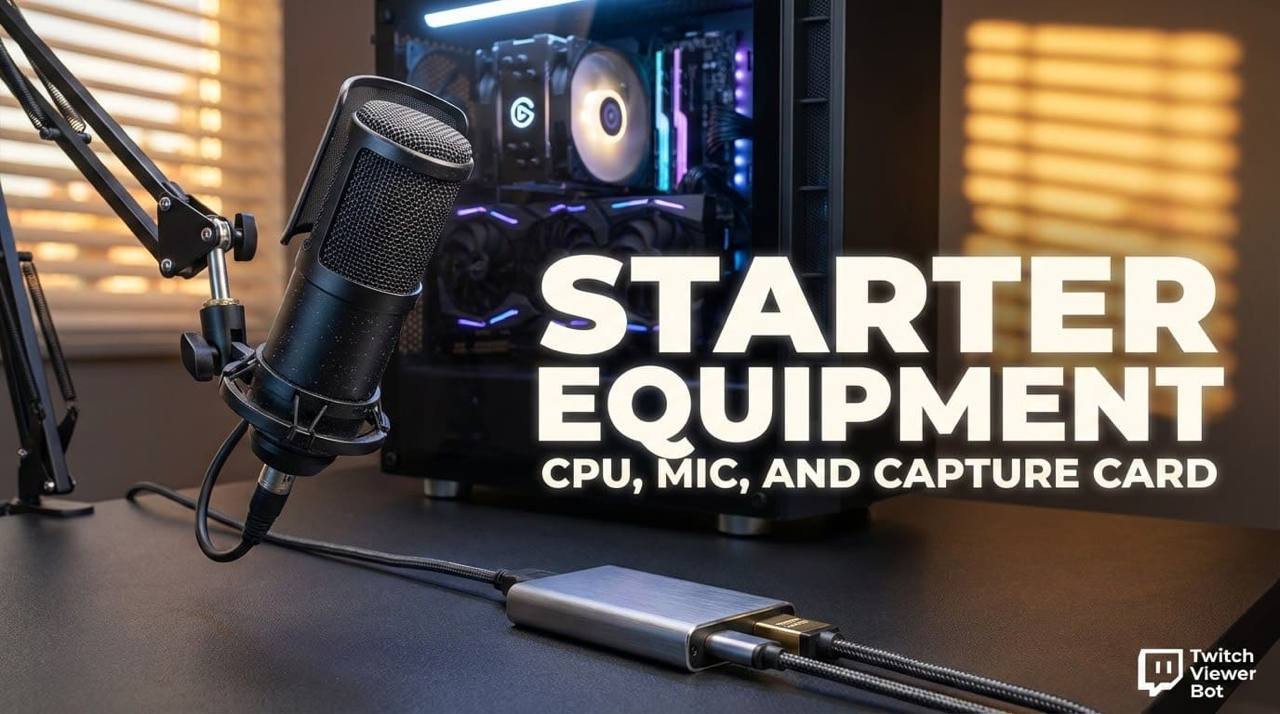
Equipment: what is needed for Twitch at the start?
Don't chase professional studio equipment immediately. Your goal is a stable live stream without critical problems. Here is the minimal set for a desktop computer:
- Computer. The main thing is a powerful processor (CPU, at least Intel i5 or equivalent) and a good video card (GPU). They take the load of video coding. For gameplay broadcasts, requirements are higher.
- Microphone (Mic). This is more important than the camera. Bad video will be forgiven, bad sound — rarely. It is enough to have a USB model of entry level.
- Webcam. Any modern HD camera will fit. Many Twitch streamers at first successfully use even a good smartphone on a tripod.
- Capture card. If you plan to stream games from a console, you will need this device.
- Stable internet. Guarantee of no lags and disconnects. Minimal requirements for a stream in 720p: upload speed (UPLOAD) not less than 5-6 Mbit/s. For 1080p — from 10 Mbit/s.
Software: the heart of your stream
To understand how to broadcast on Twitch, you need an encoding program. It takes the image from your screen or game, sound from the mic, and sends this stream to Twitch servers. The leader with no alternatives is OBS Studio (Open Broadcaster Software). It is a free, powerful, and flexible tool. Of course, you can use Twitch Studio or Streamlabs, but OBS is the standard. Spend an hour on its basic setting: creation of scenes (for example, "Game", "Waiting", "Break"), adding sources (game capture, browser window, webcam image), and audio tracks setup. Exactly using OBS you will control everything that happens on Twitch before the broadcast.
Visual and Twitch account setup
While OBS renders the scene, set up the page on the platform. First, you need to create a Twitch account if you don't have one. How to make a Twitch channel attractive? Fill the profile: think of a memorable nickname, upload an avatar, banner, and design "About me" panels. In panels, briefly tell who you are and what you plan to stream on Twitch. Indicate the streaming schedule — this disciplines you and gives viewers an understanding of when to wait for you.
Important: You must enable two-factor authentication (2FA). Without two-factor authentication, you cannot get the stream key which is needed for OBS Studio.
Also, think about the overlay and alert system (like a notification when someone follows). This makes the Twitch stream more interactive.
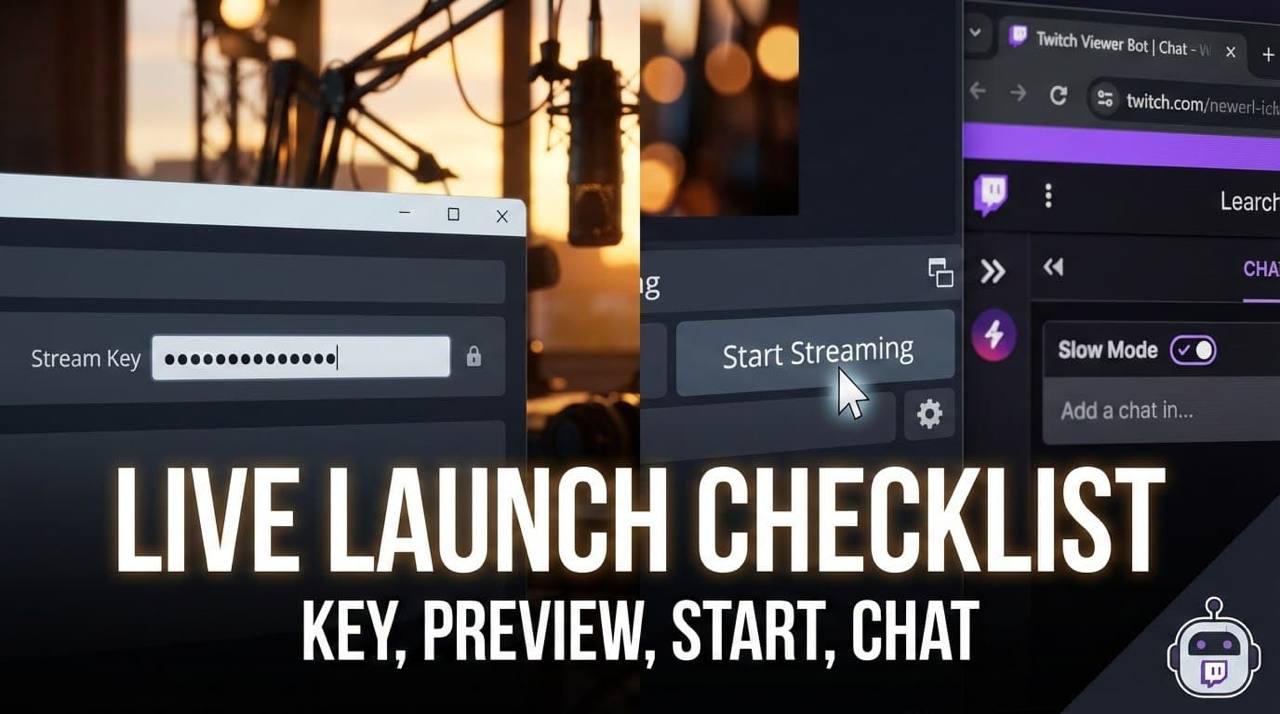
Stream launch and broadcast management
Equipment ready, OBS set up, channel designed. The moment has come to go live on Twitch for real. But the button "Start Streaming" is not the finish, but the start of the most important process: live interaction.
Before every broadcast, make a checklist:
- Technical check of equipment
- Make sure that the mic is on and works. Check if there is background noise or echo.
- Check the work of the webcam: the image must be clear, and the camera correctly directed.
- Software check (OBS Studio)
- Open OBS and make sure that in your main scene all needed sources are active (game, camera, browser, media files).
- Check if the Stream Key is actual in settings. If you just pasted a new one, restart OBS.
- Launch Broadcast Preview to visually make sure that the whole composition (picture, overlay, text) looks correct.
- Launch and interaction setup
- Press the button "Start Streaming" in OBS. Remember that the stream will appear on the channel with a delay of 10-20 seconds.
- Right after the start, go to your page on Twitch.tv in moderator mode and turn on "Slow Mode" in chat for the first 10-15 minutes. This will protect you from spam and trolls.
- Use the first minutes of the stream for greeting and communication with early viewers.
Bonus: Fast check "Hot start": Sound → Picture → Key → Preview → Start → Chat protection.
Broadcast management and work with chat
Your main task now is to balance between the process (gameplay, drawing, communication) and attention to the chat. Answer questions, say hello to newbies, thank for donations. To engage with your audience is crucial. For the stream on Twitch to be more comfortable, use moderators — trusted viewers or friends who can delete messages, ban violators, and support order. Don't be afraid of silence, but don't allow long pauses if you are not concentrated on a hard game moment. Comment on your actions, share thoughts. Remember: people come not only for content on Twitch but for personality. Exactly personality distinguishes popular streaming channels from those who stay in loneliness.
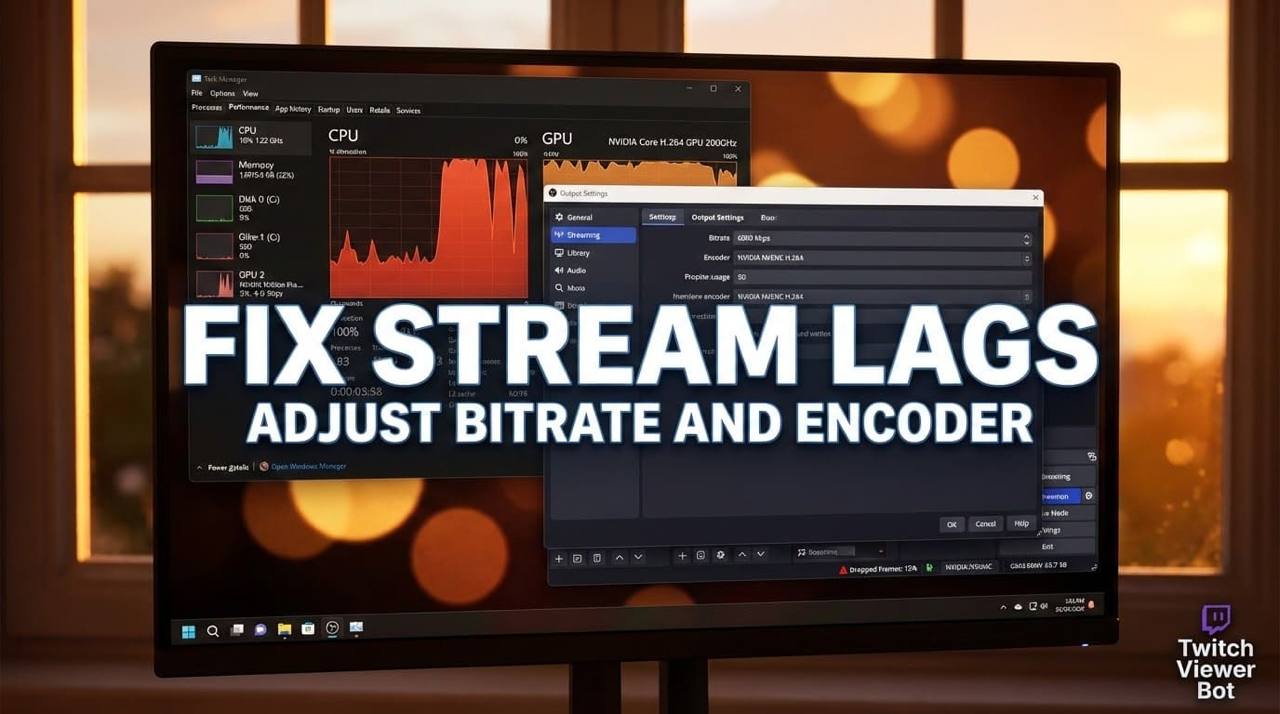
Standard problems and their solution for every streamer
Lags, sound loss, game crash — everyone who decides to stream on Twitch faces this. Don't panic and don't apologize too much. Calmly tell viewers about the technical problem, pause or finish the broadcast to restart the program or game. A clear plan "B" (for example, a spare scene for talking) and calmness in such situations cause respect.
Problem: Lags (stuttering) and image breaking in broadcast.
Solution:
- Make sure internet speed (UPLOAD) is stable. Close all extra programs that consume bandwidth.
- In OBS, change streaming settings: lower bitrate and/or resolution (for example, from 1080p to 720p).
- Check the load of CPU and graphics card (GPU) in the task manager. If it is close to 100%, try to change the encoder in OBS settings (from x264 to NVENC or vice versa).
Problem: Sound lost from microphone or game.
Solution:
- In OBS check volume indicators in the mixer. If they don't move, click on the gear and select "Advanced Audio Properties" to re-check and re-select the device.
- Make sure that in Windows sound settings the needed device is set as "default".
- Restart OBS. Often it is the fastest way.
Problem: Game crash or OBS program crash.
Solution:
- Calmly tell viewers: "Technical issues, coming back in 2 minutes".
- Switch to a prepared scene "Tech break" (with a splash screen and music) or just pause the broadcast.
- Restart the program/game and restore the stream.
Problem: Camera doesn't show image or "froze".
Solution:
- In OBS deactivate and activate again the source with the camera.
- If that didn't help, physically disconnect and connect the webcam again.
- As a temporary solution, switch to a scene without a camera and continue communication by voice.
Problem: Chat doesn't see or hear what you see/hear.
Solution:
- Always have an open tab or Twitch app on the phone to watch your broadcast with a delay and check the final picture and audio quality.
Main tip to grow your audience: after any incident or just at the end of the week, watch saved records (VOD). Look at your stream with the eyes of a viewer: where were pauses, what was successful, and where it was possible to add activity.
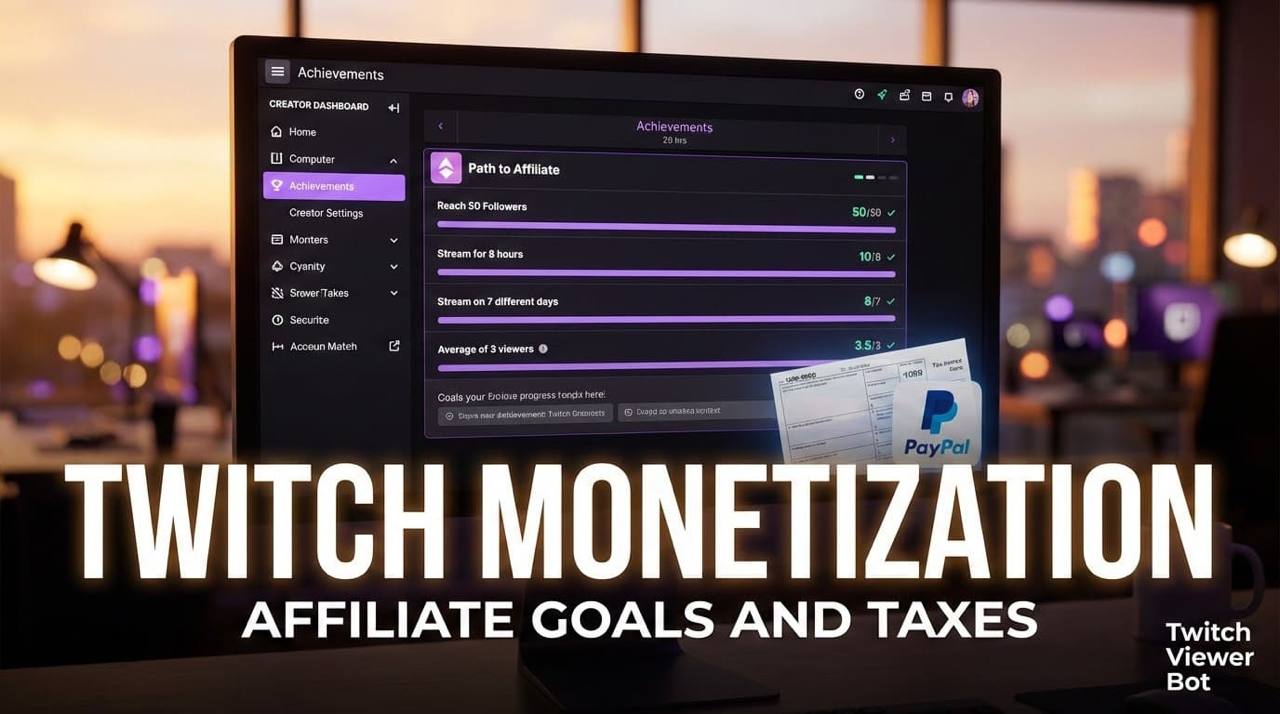
Monetization and channel promotion
When you understand how to stream on Twitch technically, and have held a few stable broadcasts, the question of development appears. How to build an audience and is it possible to earn on this? The monetization system of Twitch opens not immediately, but it is worth preparing for it from the first days.
Affiliate program and Twitch Partner
This is the main way for streamers to earn income from the platform. Affiliate status is the first step. For it you need:
- 50 followers.
- 500 minutes of broadcast in 30 days.
- 7 unique days of streams.
- Average of 3 viewers.
Reaching it, you will open the possibility to get income from subscriptions (sub channel), Bits (paid animated emotes in chat), and ads. The next step — Twitch Partner. Requirements are higher (average 75 viewers, strict conditions on schedule), but possibilities are wider: more emotes, priority support, possibility to run subscription giveaways. Don't chase the status, but chase stable quality content — requirements will be fulfilled themselves.
Financial and legal nuances
Streaming in Europe or the US is easier than in some other regions, but it has its own strict rules. It is important to know about payments and copyrights before starting.
Question of payments Twitch pays directly to your bank account or payment system. To receive money, you must fill out the "Royalty Tax Interview" and "Service Tax Interview" in the creator dashboard. This is mandatory for everyone, even if you are not a US citizen. Most popular methods for withdrawal:
- Direct Deposit / ACH: Money comes directly to the bank account. Usually takes 3-5 days.
- PayPal: Very popular for Europe and US. Fast and convenient.
- Wire Transfer: Good for large sums, but banks can take a commission.
- Check: Twitch can mail you a physical check, but it takes a long time.
Minimal sum for withdrawal (threshold) is usually $50 for most methods now. You don't need aggregators, everything works officially.
Copyright and Community Guidelines: very important! In Western countries, copyright laws are very strict. Twitch uses a system for automatic detection of copyrighted music.
- Don't play radio or Spotify. Even if you like the song, if you don't have a license, your VOD (record) will be muted.
- Live Strikes. In rare cases, if you stream a new movie or protected music, you can get a "Live DMCA Strike" and an immediate ban.
- Solution: Use special libraries with "Stream safe" music (like Streambeats) or music that is allowed for Twitch.
Taxes: it concerns you Income from streaming is real income. In most European countries and the US, content creators must report it to the tax service.
- USA: You will receive a 1099 form if you earn enough. You must report this in your tax return.
- Europe: Laws differ in Germany, France, UK, etc. Usually, you need to register as a freelancer or self-employed if your income becomes regular.
- VAT: For digital services, VAT is often handled by the platform, but check local laws.
Conclusion
To understand how to stream on Twitch from a technical point of view is possible in a few days. Much more time is required for building a community and polishing your style. The path from the first stream to the first stable viewers can take months. The main thing is to keep consistency, learn from mistakes, and get pleasure from the process. Because exactly sincere passion for what they do on Twitch distinguishes a simple broadcaster from a real content creator. Good luck with your first stream!