
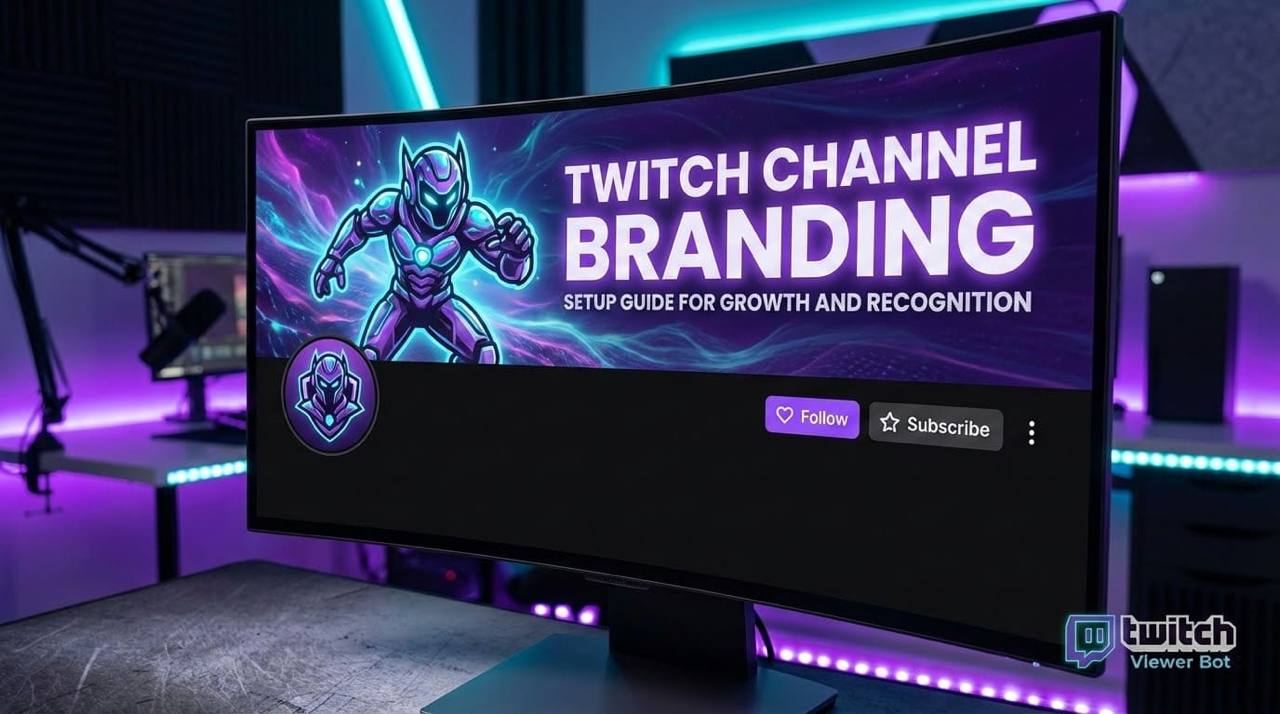
How to Design Your Twitch Channel: Professional Branding Instruction
First impressions decide everything, especially in the world of Twitch streamers. When a new viewer comes to your channel, they have a few seconds to rate your professionalism and decide if they need to subscribe. A chaotic profile with a crooked banner and empty sections signals amateurism, even if your gameplay is perfect. On the contrary, a thoughtful and visually nice space immediately inspires trust, helps the viewer understand who you are as a content creator, and reflects your visual identity to make your channel stand out and turn a random guest into a constant community member.
Competent setup of a Twitch channel for stream is a process including work with visual elements (banners, avatars, stream overlay, offline-screen) and text filling (how to make a beautiful description on Twitch), and also the technical organization of space (dashboard, panels, chat). Let’s analyze by steps how to design a channel so it works for you 24/7, attracts the target audience, and reflects your uniqueness.
Why channel design matters
Your channel is your business card, home page, and showcase at the same time. In conditions of high competition, high-quality design performs several critically important functions.
- First, it creates and strengthens your brand identity. Recognizable colors, a logo, and style help people remember you among hundreds of other creators on Twitch.
- Second, it structures information for the viewer. Clear panels for stream on Twitch with correct links to socials, chat rules, and donate conditions save you from chaos and answer the most typical questions before they are asked.
- Third, a professional look increases loyalty. For people, it is psychologically more comfortable to support someone who invests in their project.
Finally, it directly influences monetization: correctly setup donate buttons for Twitch and visual alerts stimulate viewers and subscribers to interact. Thus, the question of how to setup a Twitch stream from a visual point of view is a question of the effectiveness of your channel in general and building a brand.
Basic profile setup
This is the foundation which is always visible — in live stream and when you are offline. All starts with the correct entry to Twitch Creator Dashboard to create a setup.
Instruction: Click on your avatar in the right top corner of the site and in the menu select "Creator Dashboard". Inside the studio, on the left, find and click "Settings" -> "Channel". This page is the command center of your digital face for every Twitch user.
Work can be broken into three key stages:
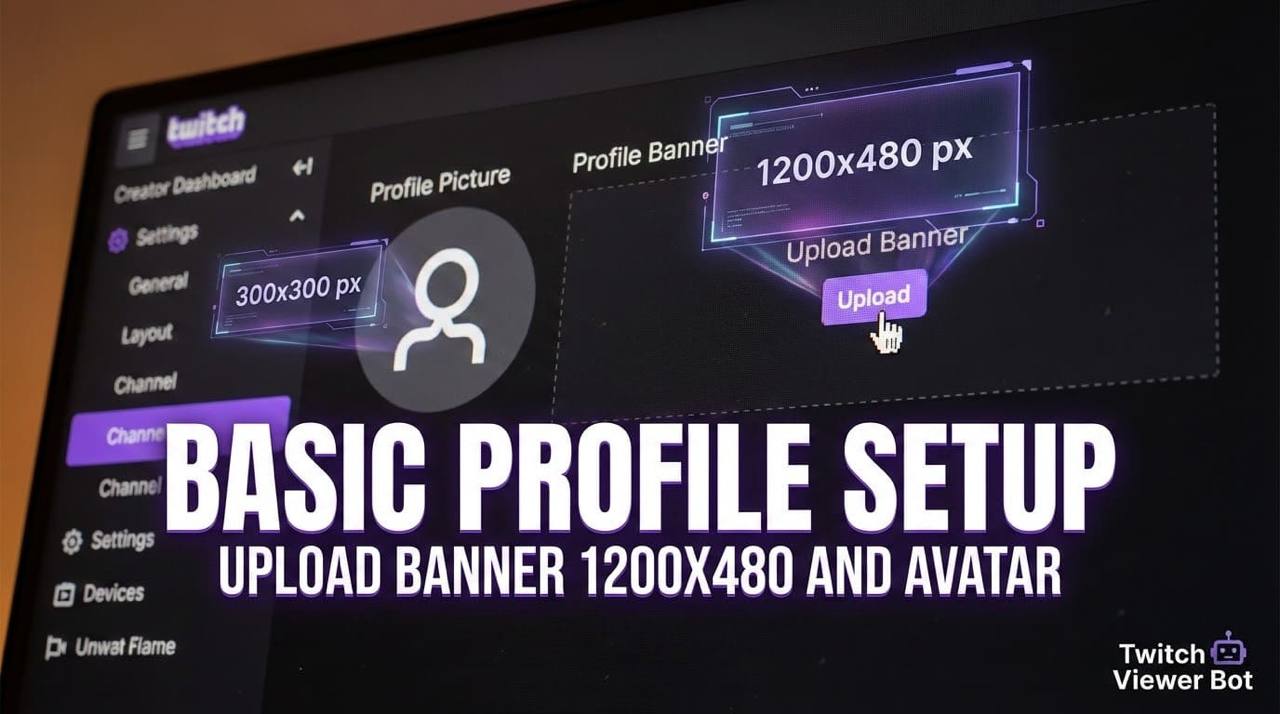
1. Uploading visual identifiers: avatar and banner
The first thing that catches the eye is the pictures. Here, clarity and matching sizes are important.
- Avatar: Your main recognizable image or profile picture. Ideally — a stylized portrait or channel logo.
- Twitch profile banner: The wide strip in the header known as the channel banner. This is the main advertising space. Here you can place a schedule, slogan, or bright thematic graphics.
Practice: In the section "Channel settings", find the block "Profile Image". Click "Upload" for the banner and, if needed, update the avatar above. For an ideal result, remember the main sizes for Twitch design:
- Profile banner: 1200x480 pixels.
- Avatar: minimum 200x200 pixels (recommended 300x300).
2. Writing text base: description and name
After the pictures, the viewer reads the text. This is your business card in words where you choose the typography and font.
- How to make a stream name: The channel name (login) is often fixed, but in settings, there is a field "Display Name". Use a recognizable and easy-to-pronounce variant. For the name of each stream, when starting a broadcast, invent bright, intriguing headers.
- How to make a beautiful description on Twitch: This is the field "Channel Description" (Bio) at the top of the page. Your task is to tell who you are, what you play, and what atmosphere you create in three-four lines. Use paragraphs and emotes for structure. A good description for a channel answers the question: "Why should I stay?"
3. Fixing important details: schedule and category
Complete the basic setup with technical points:
- Stream schedule: Specify the days and time of your regular broadcasts in the corresponding field. This shows the seriousness of your intentions.
- Default category: Choose the main game or topic by which you will be searched most often. This helps in promotion.
After filling these blocks, your profile will stop being an "empty place". You will lay the foundation for future work: creation of a banner, settings of the chat on Twitch, and development of complex panels for stream.
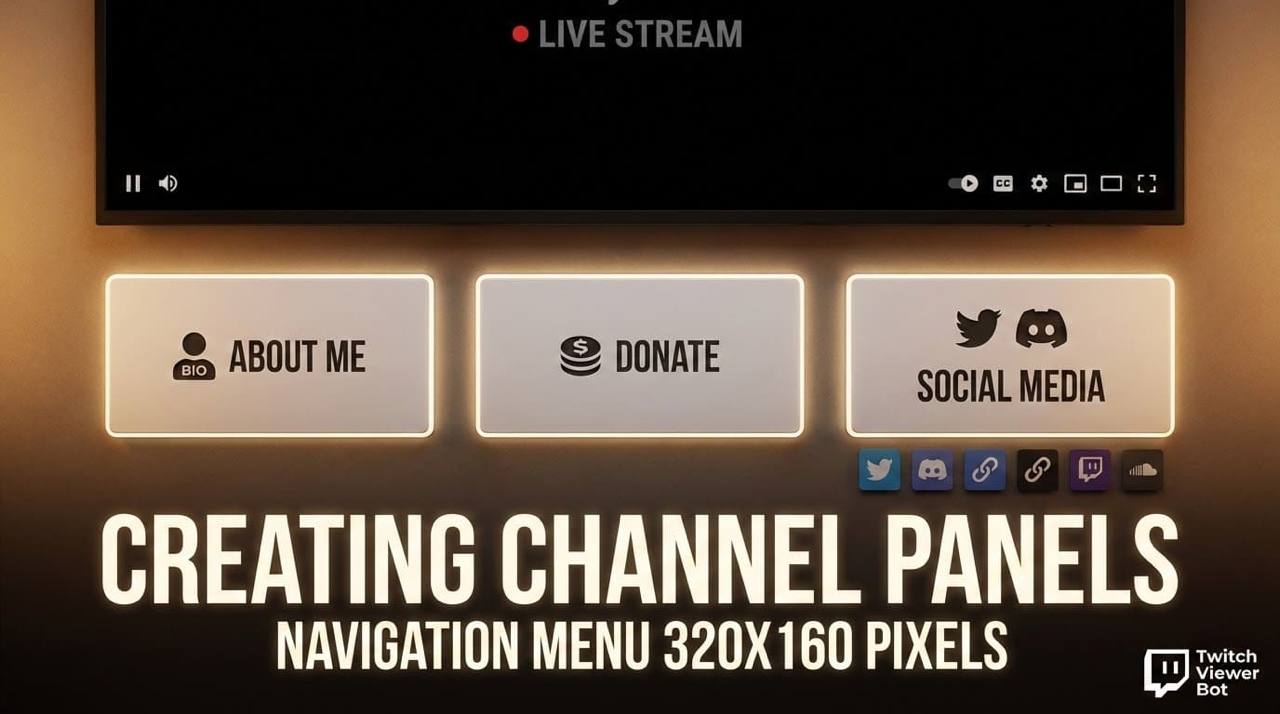
Forming channel panels
Panels (or widgets) under the video window are the "navigation menu" or layout of your channel. Exactly here the viewer will find all additional info. To understand how to make panels for Twitch, open the "Rewards" (Activations) section or channel settings in the dashboard.
Instruction for adding a panel: In the left menu of "Creator Dashboard", select "Settings" -> "Extension Panels". On the opened page, click the big button "Add New Panel". You will see a field for the header, text, and a button for image upload to create custom Twitch panels.
Standard set of info panels includes:
- "About me": An extended version of the description.
- "Social networks": Links to Discord, Twitter, YouTube, social profiles, and social media handles.
- "Chat rules": Clear and understandable behavior rules.
- "Donations": An explanation of how to support the channel, with a link to the service.
Panels for stream on Twitch can be designed graphically to be visually appealing. Create or download a set of icons in one style and add text blocks to them.
Instruction: To upload a picture for a panel, in the panel editor click "Add Image". For graphic elements, it is important to know the design sizes: the recommended size for one panel is 320x160 pixels. Exactly via panels, many setup donate buttons, leading to external services like DonationAlerts or Streamlabs.
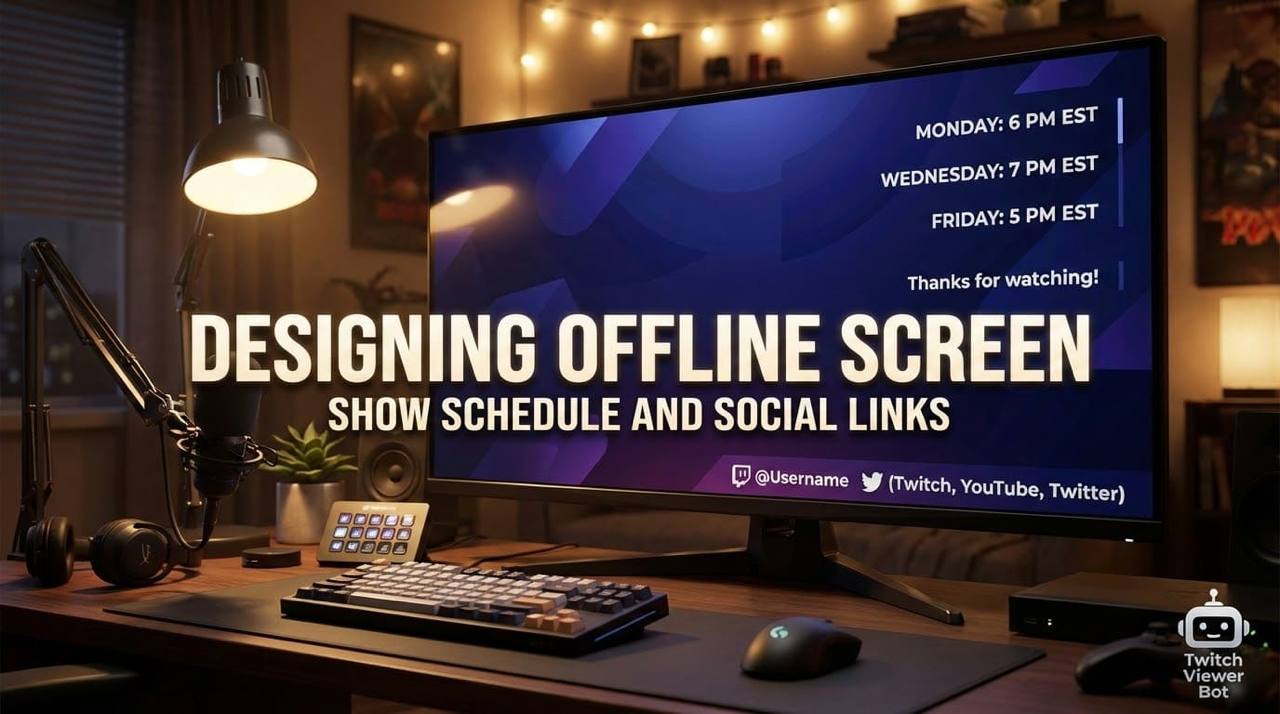
Design of offline-screen and alerts
When there is no broadcast, in the place of the video player, there must be an offline-screen or "starting soon" screen. To leave a grey square with the text "Offline" is a big mistake. Use this stream screens space with benefit!
Instruction: To set an offline-screen, go to "Creator Studio" -> "Settings" -> "Channel". Scroll to the section "Stream Status". There you will find the field for upload "Video Player Banner" — this is your offline-screen.
Best practices for offline-screen:
- Specify your stream schedule.
- Place a link to the last stream or best moments (Highlights).
- Remind them about socials and the Discord server.
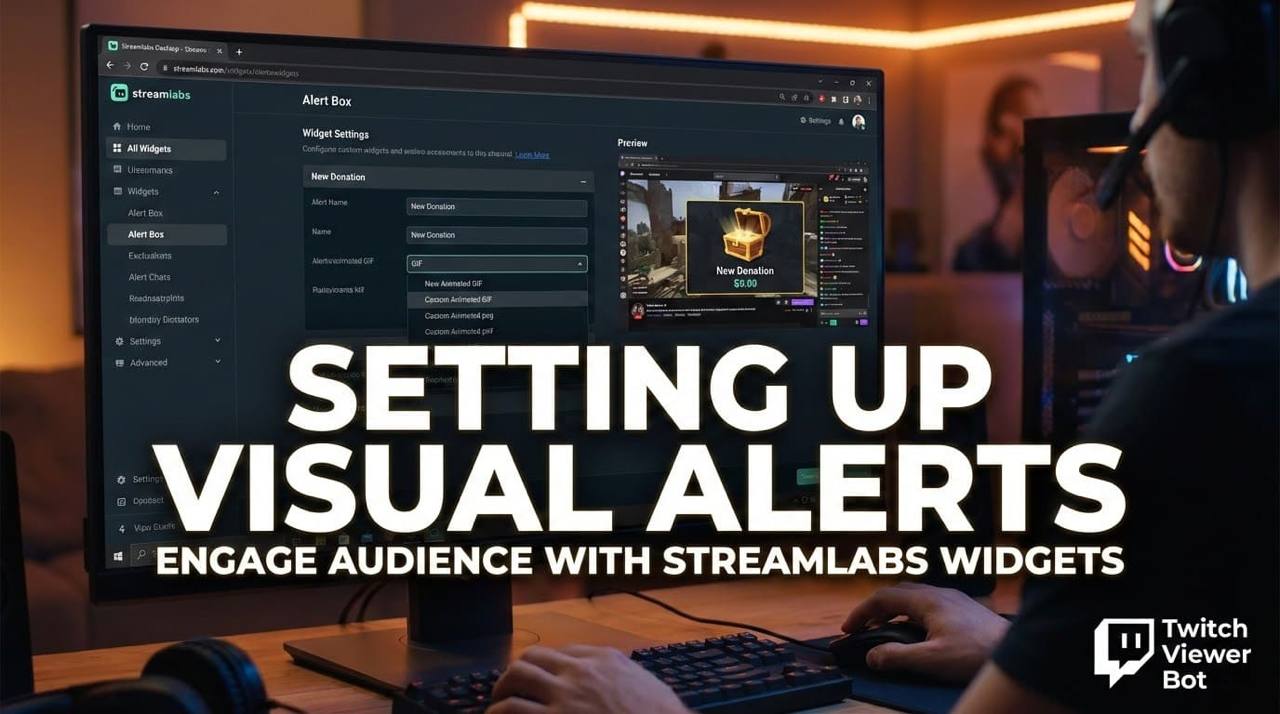
About interactive: Visual and sound notifications (stream alerts) are the heart of feedback with viewers. Their setup is an important part of the answer to the question of how to setup a Twitch stream for audience engagement and stream branding.
Instruction: Most flexible settings of alerts are located not in Twitch itself, but in third-party services integrated with it. For example, in Streamlabs. Go to the site Streamlabs.com, authorize via your account, and in the menu find the section "All Widgets" -> "Alert Box". There you can setup unique alerts for donations, subs, and followers, including the upload of your own banners for donate or animated Twitch elements.
Technical recommendations
Beauty must be not only in pictures, but in technical perfection. All visual elements must correspond to the technical requirements of the streaming platform. We already mentioned key design for Twitch sizes, but let's collect them in one place for clarity:
- Avatar: minimum 200x200 pixels (better 300x300).
- Profile banner: 1200x480 pixels.
- Offline-screen / video-preview: 1920x1080 pixels (16:9).
- Channel panels: 320x160 pixels.
Besides sizes, file formats are critically important (usually JPG or PNG) and their weight. Too heavy images can load slowly.
One more technical aspect is the setup of chat. Instruction: To set basic rules, in "Creator Studio" go to "Settings" -> "Moderation". Here you can enable filters, set the chat difficulty level, and add banned words. Use moderator bots (Nightbot, Moobot) for automation. This directly answers the request of how to make a beautiful chat in OBS or other streaming software — a clean, controlled, and friendly chat is part of the general channel design. Also, don't forget to setup a webcam frame to match your online presence.
Mistakes of beginners and how to avoid them
On the way to an ideal channel and a successful Twitch career, many make typical mistakes. Knowing about them, you can bypass them:
- Ignoring design at the start. "First I will gain an audience, then I will do beauty" — a vicious tactic which slows growth. Start with a basic but neat design immediately to brand your Twitch channel.
- Mismatch of sizes. A stretched profile banner or cropped avatar look untidy. Always check the resolution of panels on Twitch and other elements before uploading.
- Overload. Too colorful banners for Twitch donates, blinking alerts, and ten colorful panels tire the eyes. Stick to a single color palette and minimalism.
- Uninformative texts. A dry description for a channel or a panel "About me" with the text "soon here will be something" kills interest.
Forgetting about the offline-screen. An empty place is a missed opportunity to remind people about yourself. Get a professional logo or at least an eye-catching logo and create a unique style.
Resources and free tools
You don't need to be a designer or spend big money to get a high-quality logo design. Here is a list of checked resources which will help in setting up a Twitch channel:
- Canva: An ideal constructor and logo maker for beginners. In it, there are ready templates for all needed sizes: photo for banner, panels, offline-screens.
- Streamlabs OBS: Besides functions for stream, offers a huge free library of Twitch overlays, animated alerts (banners for donations, animations), and widgets.
- Placeit: A service with templates where you can fast create custom emotes, custom Twitch emotes, and a professionally looking banner for stream, just substituting your nickname.
Using these tools and step-by-step instructions, you can pass the whole path from idea to realization, finally understanding how to design a Twitch channel and logo by your own forces. Remember that design is a living organism. Collect feedback from viewers, analyze what works, and don't be afraid to experiment.